Enter now for your chance to win a 3 month Nanoimager subscription to study your EVs Enter here
5 image pre-processing steps to improve the quality of your fluorescence microscopy images
Author: Carolyn Hartmann
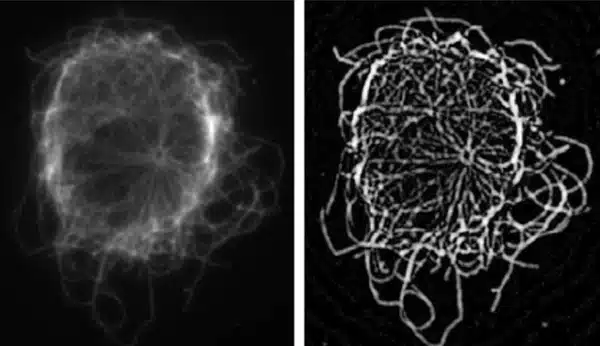
Histogram equalization
A grayscale image is a collection of pixels, which in the case of grayscale images each have an associated gray level or ‘intensity’ value. Histogram equalization can be used to ‘spread out’ these pixel intensities and greatly enhance the contrast in the image, making tasks such as segmentation a lot easier! Here is an example of histogram equalization on some microtubules from Herberich et al (2010).
Denoising
There are many different tools to approach the problem of denoising images, and the ones that you use really depend on the artifacts in your image. For images with periodic noise or scanning artifacts, try Fourier transforms and filtering. For images with ‘salt and pepper noise’, median filtering may work better.
Bilateral filtering/smoothing
Smoothing your image uniformly (e.g by using a Gaussian filter) can result in sharp edges being lost, which isn’t ideal for analyzing delicate structures. Alternatively – bilateral filtering smooths the image by using a weighted average of every pixels neighborhood. This smooths areas without much detail, and preserves sharp lines in the image. This can be seen in these example widefield images from Venkatesh, Mohan and Seelamantula (2015), where the original, gaussian smoothed and bilateral filtered images are shown left to right.

Difference of Gaussians filtering
The Difference of Gaussians (DOG) method is a simple and effective technique to enhance edges in your fluorescence images. This method is commonly referred to as ‘mexican hat filtering’ given the kernel’s characteristic shape!
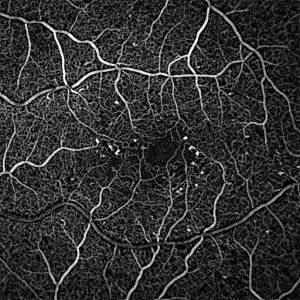
Top hat transform
A top-hat transformation is a processing step than is excellent for images with many small, bright details. Top tip – Use a structuring element larger than the size of the objects in the image you want to enhance for a deeper effect. Here is the result of a top-hat transformation on blood vessels by Keith Goatman.
Many different techniques exist for image pre-processing, and finding the right ones for your sample can be challenging. However, by trying different methods and with some experimentation, pre-processing will soon become an indispensable part of your analytical toolkit. Have fun!